
Reviewed · STIRLING CASTLE & BANNOCKBURN
Braveheart (Battle of Stirling Bridge) Tour
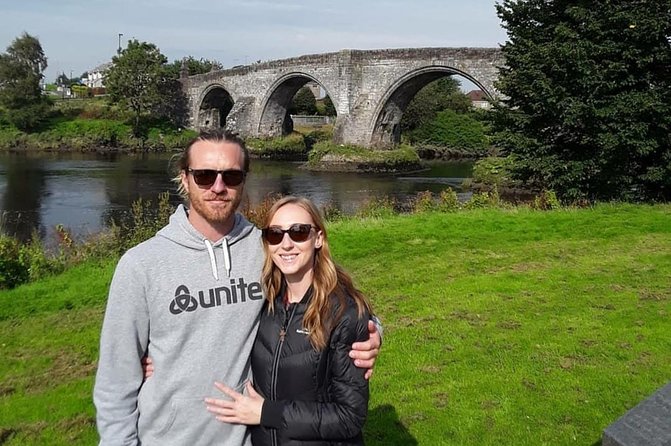
Stirling Bridge makes 1297 feel close. In a 1 to 1¼ hour, cap-at-15 walk, you track William Wallace and Andrew De Moray along the River Forth and learn why this was Scotland’s first major victory in the Wars of Independence.
I like how the experience stays personal and factual. You get on-the-ground context at the old crossing area, plus tools the guide uses to show you what’s gone and where the action actually took place.
I also like that the guide is prepared for the common movie versions of the story. You’ll hear clear corrections and context around the Braveheart-style legends, not just the official-sounding lines.
The only drawback is comfort: it’s an outdoor walk that involves some standing, so you’ll want to dress for changeable Scottish weather.
In This Review
- Key highlights you’ll feel right away
- Stirling Bridge in 75 minutes: what you actually see
- Who the tour is for (and who might want to skip it)
- Price and value: $34.45 for a small-group historical walk
- The guide approach: friendly welcome, lots of Q&A energy
- Meeting at Stirling’s Old Bridge area: fast start, easy find
- The itinerary, step by step: walking the Battle of Stirling Bridge site
- Stop 1: Stirling Bridge and the 1297 battle story
- Where the “Braveheart” version gets corrected
- The bridge you cannot see: understanding today’s landscape
- Pace, weather, and what to wear (so you can enjoy it)
- Pairing with Bannockburn and other Stirling plans
- Should you book the Braveheart (Battle of Stirling Bridge) Tour?
- FAQ
- How long is the Braveheart (Battle of Stirling Bridge) Tour?
- How many people are on the tour?
- Where does the tour meet?
- Is it in English, and do I get a mobile ticket?
- Are service animals allowed, and is it near public transportation?
- What if the weather is bad, and can I cancel for a refund?
Key highlights you’ll feel right away
- Max 15 travelers keeps the tour from feeling rushed or crowded
- Meets steps from the Old Stirling Bridge at Laurencecroft Road / Stirling Old Bridge area
- William Wallace and Andrew De Moray get real context, including their roles and fates
- On-site location visuals help you understand where the original wooden bridge stood
- Braveheart-style myths get sorted out with corrections and alternate possibilities
- Mostly outdoors, some standing means clothing for wind and rain matters
Stirling Bridge in 75 minutes: what you actually see
This is a focused Battle of Stirling Bridge tour built around one main stop: the Stirling Bridge area on the River Forth. With a time window of about 1 hour to 1 hour 15 minutes, it’s the kind of outing that helps you get your bearings fast in Stirling without eating half your day.
Expect to be outdoors most of the time. You’ll do a walk in the vicinity of the old crossing, then spend time standing while the guide explains where key moments likely unfolded and why the terrain matters. If you’re the type who likes your history tied to real geography, this format works well.
The core story line is William Wallace and Andrew De Moray rising to the forefront during the Wars of Scottish Independence, then their later deaths and legacy. It’s not just a sequence of battle details. The tour frames why this event mattered in Scotland’s fight and why people kept returning to these names afterward.
More Stirling Castle and Bannockburn outings we like near Stirling


Who the tour is for (and who might want to skip it)
This tour fits you if you:
- want a readable entry point into the Wars of Independence around Stirling
- enjoy a guide who answers questions on the spot
- like history that points to exact places, even when the original structures are gone
You might want to choose a different style of tour if you expect a long, fully guided walk across a battlefield in every direction. This one is more about interpreting a specific area near the bridge site than marching across a huge open field.
It also helps if you’ve seen Braveheart, or you’ve heard the popular versions of Wallace. The guide actively addresses those story gaps and mix-ups, so the tour becomes a chance to correct what movies and simplified retellings can get wrong.
Price and value: $34.45 for a small-group historical walk
At $34.45 per person, the pricing feels fair for a short, guide-led experience in one of Scotland’s most story-dense locations. You’re not paying for museum tickets or transport costs. You’re paying for someone to translate a complicated event into something you can picture on the ground in about an hour.
Two value points stand out:
- Small group cap (15 max) means you’re more likely to get your questions answered. In short tours, that matters.
- The stop is marked as admission ticket free, which usually signals you’re not paying extra entry fees just to stand and learn by the River Forth.
If you’re budgeting, I like that you can combine this with other Stirling plans. You’re unlikely to blow your schedule. You can also pair it with other nearby history stops on your own time.
The guide approach: friendly welcome, lots of Q&A energy
The strongest praise around this tour centers on the hosting style. Guides in this operation, including Steven and David (and often a team with people like Oatly and Molly), come across as warm and engaged rather than distant.
You’ll get the impression that they care about how visitors are welcomed, not just what’s recited. That shows up in how they explain the story. You’re not left with vague ideas like “it happened near the bridge.” You’re given ways to visualize the bridge site and the battle sequence more clearly.
One specific detail that comes up: the guide uses a tablet to show details about the original wooden bridge. There’s very little physical trace of the bridge today, so a visual aid helps you connect the 1297 story to what you’re actually seeing now.
The same theme shows up in corrections, too. The tour specifically addresses Braveheart-style inaccuracies. If you’ve been carrying assumptions from popular culture, this is where they get adjusted.
Meeting at Stirling’s Old Bridge area: fast start, easy find
You meet in the Stirling Old Bridge / River Forth area, near Laurencecroft Road, just steps from the Old Stirling Bridge. This makes it a good first-history stop if you want to orient yourself early in Stirling.
The tour also notes that it’s near public transportation. So you shouldn’t need a car to make it work, which is a big plus if you’re basing yourself in town.
Because it’s a short outing, showing up on time matters. Bring a bit of patience for Scottish weather, but also plan to arrive a few minutes early so you’re not trying to catch the story mid-explanation.
- Stirling Old Town Private Walking Tour★ 5.0 · 24 reviews
- Stirling Castle: Skip-the-Line Guided Tour in Spanish★ 4.8 · 19 reviews
- Stirling: Private Old Town & Castle Walking Tour★ 4.9 · 17 reviews
- 3 Hour Private Tour of Stirling Old Town and Stirling Castle★ 5.0 · 17 reviews
The itinerary, step by step: walking the Battle of Stirling Bridge site
This experience centers entirely on one stop. Here’s what that means on the ground and why it works.
Stop 1: Stirling Bridge and the 1297 battle story
You start in the Stirling Bridge area and walk in the footsteps associated with William Wallace and Andrew De Moray. From there, the guide builds a narrative arc that runs from their early days up through the moments that put them at the vanguard, then toward their deaths and legacy.
What makes this stop special is how it handles the big missing piece: the bridge itself. The wooden bridge from the Battle of Stirling Bridge in 1297 is not something you can simply point at today. Instead, the guide helps you locate where it was believed to be, and where it collapsed during the battle.
You’ll also hear the story connect to the roles of De Moray and Wallace as leaders associated with Scotland’s resistance and governance. The tour even includes a playful explanation around the name Andrew De Moray, using a quick joke about the similarity to Andy Murray, before returning to the historical importance behind the name.
A couple practical things to look for during the talk:
- the tablet/visual mapping that shows the old wooden bridge position
- the guide’s explanation of how the terrain and river crossing shaped the battle
Also, if you’re sensitive to contradictions in history, you’ll appreciate that this tour includes alternate theories and possible bridge locations. It’s not pretending every detail is certain. It’s showing you why different ideas exist and how the guide thinks about the evidence.
Where the “Braveheart” version gets corrected
If you came to Stirling Bridge with movie scenes in your head, the guide likely takes time to untangle what Braveheart got wrong. One review specifically praised how the guide debunks incorrect Braveheart tales, especially around Wallace and the battle.
That correction element is one of the biggest reasons this tour feels worth it, even if you could technically walk the area on your own. Left alone, you can see the river and the bridge surroundings. With the guide, you get a structured explanation that separates legend from plausible history.
The bridge you cannot see: understanding today’s landscape
The hardest part of Stirling Bridge history is also what makes the tour compelling: you’re trying to picture an event where the key structure no longer exists in a straightforward way.
A key detail from the tour description and the guide’s explanations: you can view the location where the old wooden bridge from 1297 was believed to be, and where it collapsed during the battle. But you also learn why today it feels different. There’s not much left to physically identify the bridge.
A tablet helps solve that. And there’s another human touch that shows up in stories about the guide: model building. One review noted a model of the original bridge built by the guide and his dad in their yard. Another response clarified that the model connects to real-world flood defense, and that it uses metal legs as part of that role.
You don’t need to be a model-building enthusiast to enjoy that detail. It simply reinforces the overall point: the guide puts effort into helping you visualize what’s missing.
Pace, weather, and what to wear (so you can enjoy it)
This is outdoors in Scotland, so plan for the obvious: wind, rain, and sudden shifts. The experience is listed as requiring good weather, which usually means it won’t run if conditions make it unsafe or unenjoyable.
The pace is also a factor. One review described it as not a lot of walking, with more standing during explanations. That’s good news if you want to avoid long distances, but it also means you should wear layers and bring a waterproof top if there’s any chance of rain.
If you get cold easily, treat this like a practical outdoor standing event, not a casual stroll. Gloves or a warm hat can make the difference between “I learned a lot” and “I just waited it out.”
Pairing with Bannockburn and other Stirling plans
This tour pairs naturally with other Wars of Independence stops because it gives you one key thread: the leadership and momentum around Wallace and De Moray in 1297. Then, when you later explore other battle sites in the region, the names and themes are already in your head.
One review highlighted booking this tour and a Bannockburn tour for the same day with an adjustment based on guide availability. Even if you don’t book two tours back-to-back, I like the idea of doing Stirling Bridge early or mid-day and leaving the evening for museums, food, and wandering.
Should you book the Braveheart (Battle of Stirling Bridge) Tour?
Yes, if you want a short, small-group history walk focused on William Wallace and Andrew De Moray with real place-based explanations. At $34.45 for an hour to 1 hour 15 minutes, the value is in the guide’s interpretations, the on-site visual aids, and the myth-corrections around Braveheart.
Skip it only if you expect a long, immersive battlefield hike with lots of movement across many sites. This one is more about focused storytelling on and around the old bridge area, plus time standing to take it in.
If you’re on a tight schedule in Stirling and you want a first-time-friendly way to understand why the Battle of Stirling Bridge matters, this tour is an easy yes.
FAQ
How long is the Braveheart (Battle of Stirling Bridge) Tour?
It lasts about 1 hour to 1 hour 15 minutes.
How many people are on the tour?
The tour caps at a maximum of 15 travelers.
Where does the tour meet?
It meets at the Stirling Old Bridge area on River Forth, Stirling FK8 1AQ, near Laurencecroft Road, and ends back at the meeting point.
Is it in English, and do I get a mobile ticket?
Yes, it’s offered in English, and you receive a mobile ticket.
Are service animals allowed, and is it near public transportation?
Service animals are allowed, and the meeting area is near public transportation.
What if the weather is bad, and can I cancel for a refund?
The tour requires good weather. If it’s canceled due to poor weather, you’ll be offered a different date or a full refund. You can cancel up to 24 hours in advance for a full refund.
More Tours in Stirling
- Stirling Old Town Daily Walking Tour (11am & 2pm)
★ 5.0 · 279 reviews - Stirling: Daily Guided Walking Tour (11am & 2pm)
★ 4.7 · 66 reviews - Bannockburn Battlefield Tour
★ 5.0 · 36 reviews - Stirling Old Town Private Walking Tour
★ 5.0 · 24 reviews - Stirling Castle: Skip-the-Line Guided Tour in Spanish
★ 4.8 · 19 reviews
More Stirling & Bannockburn Trips from Stirling
- Stirling Old Town Daily Walking Tour (11am & 2pm)
★ 5.0 · 279 reviews - Stirling: Daily Guided Walking Tour (11am & 2pm)
★ 4.7 · 66 reviews - Bannockburn Battlefield Tour
★ 5.0 · 36 reviews - Stirling Old Town Private Walking Tour
★ 5.0 · 24 reviews - Stirling Castle: Skip-the-Line Guided Tour in Spanish
★ 4.8 · 19 reviews
More Tour Reviews in Stirling
- Stirling Old Town Daily Walking Tour (11am & 2pm)
★ 5.0 · 279 reviews - Stirling: Daily Guided Walking Tour (11am & 2pm)
★ 4.7 · 66 reviews - Bannockburn Battlefield Tour
★ 5.0 · 36 reviews - Stirling Old Town Private Walking Tour
★ 5.0 · 24 reviews - Stirling Castle: Skip-the-Line Guided Tour in Spanish
★ 4.8 · 19 reviews
Still browsing? A handful of other Stirling trips worth a place on the list

Stirling Castle & Bannockburn, compared.
 ★ 4.7Loch Lomond, Trossachs & Stirling Castle TourFrom $711,397 reviews
 ★ 5.0Stirling Castle, Loch Lomond and Cruise Day Tour from GlasgowFrom $98566 reviews
 ★ 4.8Stirling Castle & Loch Lomond Tour with CruiseFrom $93514 reviews
 ★ 4.5Loch Lomond, the Trossachs and Stirling CastleFrom $58343 reviews
 ★ 5.0Stirling Old Town Daily Walking Tour (11am & 2pm)From $19279 reviews
 ★ 4.5Glasgow (Greenock) Shore Excursion: Stirling, Loch Lomond & The HighlandsFrom $93267 reviews
 ★ 5.0Stirling Castle, Loch Lomond Walk & Whisky Distillery Tour from GlasgowFrom $9079 reviews
 ★ 5.0Loch Lomond National Park & Stirling Castle Full Day TourFrom $6768 reviews
Browse the lists this tour appears in